500 years after the devastation of the Earth, two factions arise from their underground cities.

I must admit it took me a little time to get my head around the quite original activation and combat systems, but once I understood what was going on it all clicked smoothly into place. The basis of the game are Order tiles and Command Point counters. Basically, whenever you activate a character you draw an Order tile from the bag, add it to the selection of tiles and Command Points you have hidden behind your little player screen, then choose a tile to assign to your character. You then assign Command Point tokens to actions on the tile. Each tile has four order types on it—either close combat, move, interact, search, or shoot actions, with a number on each type shown.

In short, if you love an extremely thematic game with a lot of tactical possibilities, detail, and endless opportunity for expansion, you’ll love Earth Reborn.

You assign CP counters to the orders you want your character to take, as he takes them. For example, you may want to assign 2 CP to a move action, so if your character has a movement value of 5, he could move 10 squares. Then you could assign 1 CP to a close combat action, allowing your character to attack an adjacent enemy. Then you could assign another 1 CP to another move action so he could run off another 5 squares afterward!

You can easily see that this ingenious system gives you an incredible amount of flexibility during your turn—it’s not just ‘move then shoot’. However the selection of tiles and the amount of CP counters you have also give you built-in limits which can be incredibly frustrating and really get you thinking tactically. You may have plenty of options for running around at high speed, but very few for delivering accurate fire or strong attacks, for example. You have to manage your options carefully for the optimal result. This makes every game interesting and different.

I won’t go into all the specifics of the combat system—not to mention all the other possibilities for manipulating equipment, spying, searching for items or even capturing your opponents and torturing them for information!—but suffice it to say they all flow very smoothly and once you get the hang of the Iconographic Phrasing System (I.P.S.—these designers love their acronyms!) you can see at a glance how each special ability works.

In short, if you love an extremely thematic game with a lot of tactical possibilities, detail, and endless opportunity for expansion, you’ll love Earth Reborn. It’s definitely a game for ‘game hobbyists’.

The latest version of this summary includes my larger, clearer, redesigned versions of the character cards.

Enhancement Guide

Z-man Games’s epic Earth Reborn lately hearkens back to the days of ‘big box’ games by Games Workshop in the 90s like Advanced Space Crusade and Warhammer Quest; a game packed with potential for enhancement, homegrown scenarios, and expansion—a big ‘sandbox’ of a game. Let me show you some things I’ve already done to enhance this fantastic post-apocalyptic combat game.

Firstly, the designers have provided endless hours of gameplay, and there’s really nothing that has to be added to what’s in the box and what’s online. Earth Reborn itself comes with nine scenarios that have a lot of replay value, but the included Scenario Auto Generating System (affectionately dubbed ‘S.A.G.S.’) means that by following specific rules, you can easily generate an infinite number of scenarios yourself. Go through the steps of building a map, assembling teams, selecting equipment, and drawing a number of Mission cards from the supplied decks, and you’re ready to go. And there’s even a S.A.G.S. system specifically designed for 3 or 4 players.

There’s a lot more stuff for the game at the Earth Reborn website, where you’ll find an community of players, online and offline map designers, multi-player rules, and player-created scenarios to try.

Now, on to my personal improvements for owners of the game. Firstly, I’ve created a comprehensive rules summary and set of reference sheets. The game rules can be quite daunting at first glance, but the nine scenarios cleverly take you through the rules, adding concepts as you play through them and get used to the way the game works. But once you’re using all the rules you’ll find my summary very useful to give you all the information you need without all the detail and examples that are in the rulebook.

Another thing I did was to redesign the character cards that come with the game (you’ll find them in the above mentioned file). Now of course the original cards work just fine, but I decided I’d make them a bit bigger and a bit clearer, and actually write out the special abilities as well as show them with the icon system. These are just an optional extra, but a good example of how a game like this can bring out the hobbyist in some gamers!

Finally, I decided to replace the original box insert with my own, made of that incredibly useful stuff—foamcore. You can find foamcore in art supply shops and it’s very easy to cut with a craft knife and a metal ruler (watch those fingers!), and build with using white glue (and pins for extra strength). Now the plastic box insert that comes with the game is actually custom-designed and has a special place for everything, but I personally like to make foamcore inserts for most of my games. This one is designed with a removable tray for all the counters.
Earth Reborn insert and cardMy custom-made foamcore box insert. Note the custom character cards and removable counter tray. I added the green plastic marker as an Initiative token and the figures come unpainted in the box.
As you can see, Earth Reborn is not just a game, it’s a hobby, and I’m sure I’ll come up with even more ways to enhance the game as I play it more often. But then that’s one of the endlessly fascinating things about gaming in general; you don’t have to stop at what you’ve been given in the box.

Painting Guide

Earth Reborn is a fantastically detailed skirmish game set on a post-apocalyptic earth that features an incredible array of scenarios and a rich, tactical system. Like all good skirmish games, it comes with some very cool miniature figures, and like all miniature figures, they look a lot better when they’re painted! Allow me to take you through the process of getting your plain plastic figures looking like proper post-apocalyptic warriors.

There are a couple of things about Earth Reborn that make the miniatures easier to paint, and there’s one thing that makes it a little trickier. For a start, you won’t have to worry about the usual wash-in-detergent-and-water and undercoating steps. Your figures are already primed and ready to paint, and I had no problems painting directly onto the figures. As usual, however, I did do a little clean-up with a sharp blade (watch your fingers kids!), removing a few mould lines and imperfections.

Another thing that makes the painting easier is the excellent reference material—in the Scenario Book you’ll find some large illustrations that are a good guide to colour choices. I chose to follow these pretty closely, but of course you can pick any colours you’re happy with. The Mammoth Mark II has a camouflage pattern, for example, that I didn’t bother to paint on the miniature.

What makes these figures a little trickier to paint are the bases. The figures come glued to bases that already have stickers attached to them (showing the different coloured arcs for line of sight and damage). This means that you’ll either have to remove the figures from the bases before painting, or paint carefully around the feet. I originally removed the figures, but I must admit it probably would have been easier just to paint carefully near the actual sticker, because you can damage it by removing the figure if you’re not careful—and lucky.

Remember, what follows is just my personal approach to painting these miniatures. There are many different ways of painting—lots of people like painting on top of a black undercoat, for example—but I’ve found this technique gives me a nice balance between good-looking playing pieces for my games, and getting them done relatively fast so we can start playing! Some painters may choose more careful, slower techniques, and there’s no doubt these are very detailed character pieces that would benefit from that approach.

My technique, however, is based heavily around a little product from Games Workshop that pretty much changed my life when it came to painting figures faster—yes, I’m talking about that wonderful wash, Devlan Mud. (now called Nuln Oil) I can’t tell you how much this stuff speeds up my painting. For most figures, all you have to do is paint your base colours, wash the figure in Devlan Mud, then do one or two quick highlighting passes, to get a great looking figure. The trick with Devlan Mud is, after you’ve applied it, use a dry brush to soak up any excess wash in or on the areas where you don’t want it to pool (wipe it on a piece of paper towel each time you soak up some wash). That way you have lots of control over how the shadows and detail are brought out by the wash.

So, let’s have a look at my results, which hopefully will inspire you to get these great figures painted.

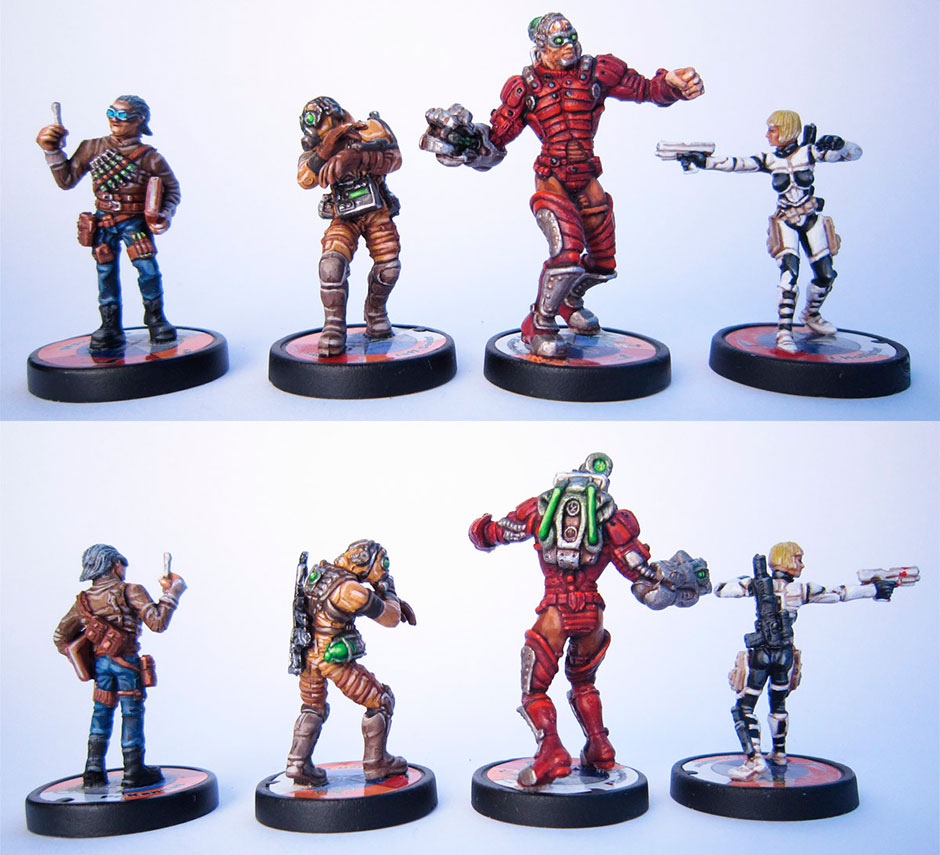
First we have some of the Salemite figures; left to right: Professor John Kendall Jr, Jeff Keeler, Franck Einstein (groan!), and Jessica Hollister. With all of these close-up photographs the individual brushstrokes tend to stand out more, but at a normal viewing distance the highlights blend in nicely. Remember, I’m going for attractive playing pieces here, not showcase or competition paint jobs! As you can see, the figures are absolutely covered in fine detail, which really benefits from a tiny brush and a steady hand at the highlighting stage. Luckily your Devlan Mud wash will have brought out all that detail and made it easy to see!

Earth Reborn miniatures

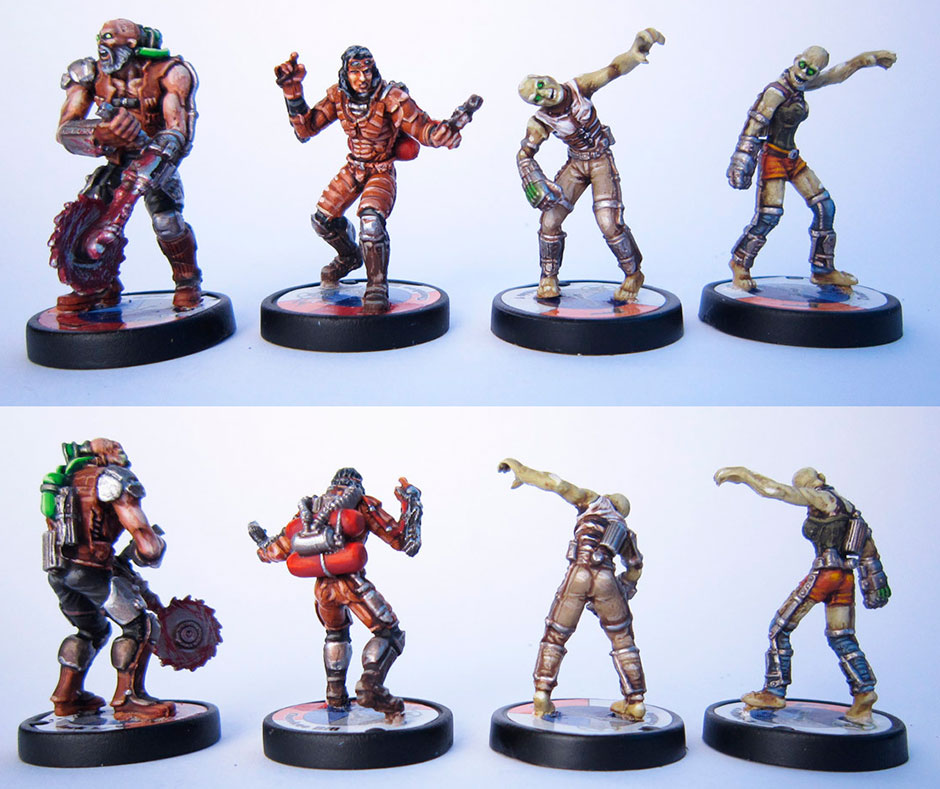
Next up we have some more Salemite faction figures: Jack Saw, Cherokee Bill, and two zombies! Yep, the Salemites are very much into re-using the dead for their own nefarious purposes, and in fact poor old Jack Saw has been dead for quite some time as well. The two zombies took a little more effort to complete, because unfortunately the cards for them (Zombie 1 and Zombie 2) are mixed up. So I went to the completely unnecessary trouble of swapping the zombies on their bases. Then I discovered that this changed the facing of the figures a bit, so I cut and shifted the heads so they were facing the right way! That explains why these zombies won’t look like the ones you get in your game, and the right-hand one is looking like a bit of a reject from Saturday Night Fever! Still, I like the results …

Earth Reborn miniatures

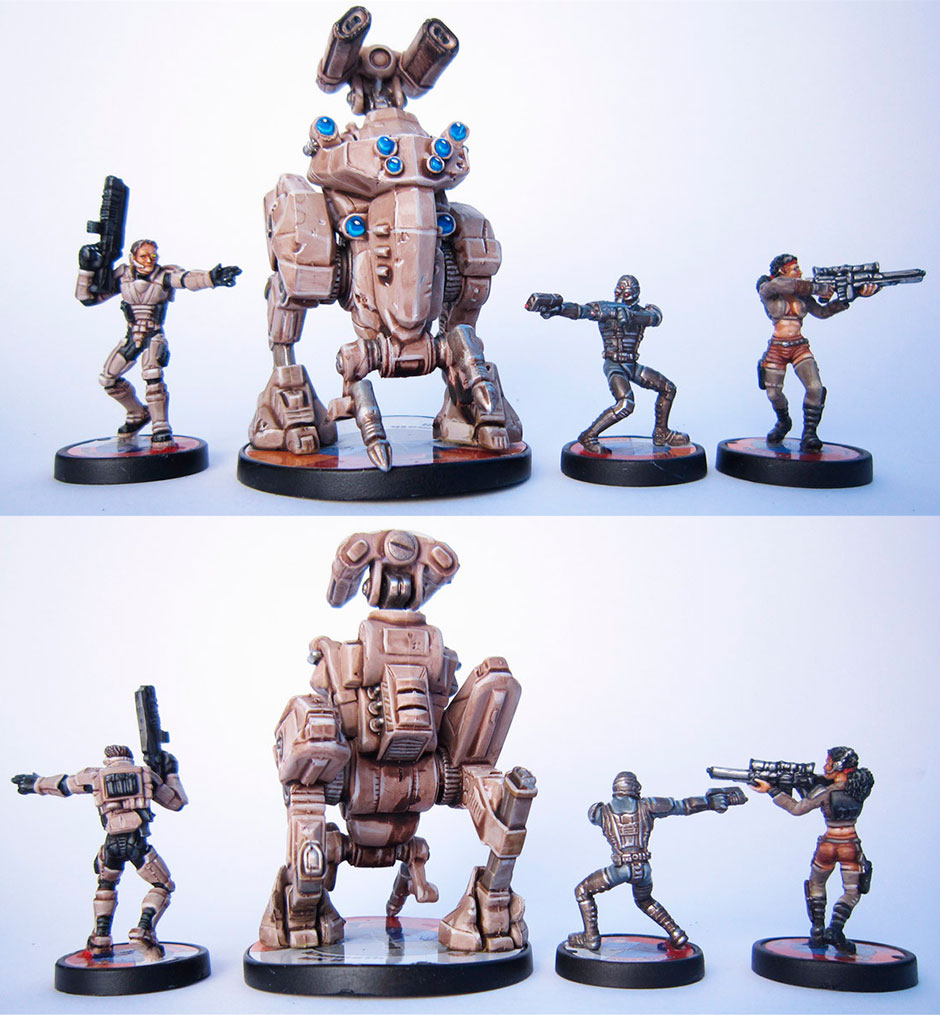
Finally, the good guys, who have the biggest, baddest figure in the game—the Mammoth Mk II. The NORAD faction may seem to be badly outnumbered, but nothing is quite what it seems in this game as there are traitors around every corner …

With our giant robot is Colonel Nick Bolter, Lieutenant Monica Vasquez, and Agent James Woo. I gave Bolter and the Mammoth the same base colour so they go together nicely. Woo has a pretty sharp metallic-and-grey look happening, and Vasquez is in no-nonsense browns.

Earth Reborn miniatures

The Mammoth may look like a slightly daunting figure to paint, but the same techniques apply. A thin coat of GW Dheneb Stone, and some Chainmail on the machine parts, all washed with Devlan Mud. Then I went carefully over the miniature with two stages of highlighting. For machines like this ‘edge highlighting’ is particularly effective. With a tiny brush just highlight the edges of all the shapes, imagining a light source shining down from above the miniature as a guide. Don’t forget to highlight the bottom of those little battle damage scars, it really brings them out and gives the robot that ‘in the wars’ feel. The Devlan Mud wash I left pretty rough on this figure, as it nicely represented the oily, used look I was going for with this workhorse combat robot. I bit of a black drybrush around the weapon ports adds to the effect.

The spotlights are easily done: a base blue, with a dark rim at the top, a light rim at the bottom, and a white dot at the top for a highlight and you’re done.

Update Log

Date Version Changelog
Jun 2019 2.9 Wording on Jeff Deeler card fixed
Feb 2014 2.8 Magnetic Disruptor equipment listing fixed
Feb 2012 2.7 Minor change to wording of ‘Activate a Character’ phase on summary and reference
Feb 2012 2.6 Minor changes
Oct 2011 2.5 Type on Cherokee Bill card fixed
Sep 2011 2.4 James Woo & Franck Einstein cards fixed
Sep 2011 2.3 Reference sheet errors fixed
Aug 2011 2.2 Text error on Jack Saw’s wounded side fixed
Aug 2011 2.1 added Jeff Deeler card
Aug 2011 2 Fixed a typo, and added complete redesigns of the character cards
Jun 2011 1 Original release

14 Comments

  • Jason Christie says:

    Your guides have helped my gaming buddies and I though a large number of our games. A huge thank you.

    Will you be releasing a foam core guide for Earth Reborn at any point?

    • Universal Head says:

      Great to hear! I do have one done, but my copy is in storage at the moment after a recent move to another country and I’m not sure when I’ll be getting my hands on it again. But when I do, I’ll definitely plan up the box insert. Sorry I can’t be more definite at this stage.

  • Cody says:

    Oh man, the redesigned character cards look soooo much better. Thanks for this one-

  • Salim Khoury says:

    I’d like to use your cards but I’d want them to be printed professionally (Linen Finish, Rounded Corners, etc). Is there a recommendation?

  • tr00 kvlt says:

    thanx guys! at last i can play earth reborn

  • Warfinger says:

    +1 for the foam core plans when you are able to get your copy back. I’ve already made use of your other plans which are excellent. Thanks!

  • BQ says:

    Agreed, would love to see some foamcore plans for this.. might even just give it a crack myself, as I don’t rate the box insert at all. It was a good try by the publishers, but it’s just a pain to be honest!

  • Joacim says:

    I believe I found a mistake in your summary
    “End of Round
    When the active player has performed one of the above actions,
    it is the end of his round of Activation. Close all Sliding doors
    that have been opened this Activation round.”
    According to the scenarios book page 18 in the hint box the sliding door closes after activation of a single character activation not at the end of the activation phase.
    or did i misunderstand your summary?

    • Universal Head says:

      Yep, it’s correct: the activation *phase* consists of all the player’s activation *rounds*. So sliding doors opened during a character’s single activation round close at the end of that round. Then the next player has his activation round. When all activation rounds are finished, it is the end of the phase.

  • Don Cristo says:

    Great paint guide, great break down, really great rules summary and reference. love them cards btw, great game! Good work, oh yeah said before “its like life really” ;-). I do have one question about the removel of the figure from the base, i really like that idea. I just started to paint, My bases are realy messy, so it would be nice to remove the figures from there bases. Maby you can explane to me how you did it?

    • Great to hear you’re finding all this useful. Unfortunately my copy is in storage and I haven’t played the game much, after all this prepping effort! I can’t remember how I got the figures of the bases – it was quite some time ago now – but it probably involved a sharp new craft blade or scalpel and great care. As I mentioned, this is very difficult to do without damaging the sticker, so in hindsight it really wasn’t worth the bother.

Leave a Reply

This site uses Akismet to reduce spam. Learn how your comment data is processed.